Rehabilitating a calf tear: when the doctor becomes the patient
Last fall I had the misfortune of tearing my calf playing squash. I felt like a gunshot went off in my calf and knew I tore something. To my relief my Achilles tendon was still intact. It quickly became apparent I suffered a calf tear.
An MRI confirmed an extensive partial thickness tear of the medial gastrocnemius (inside of the calf). Like most athletes, my goal was a full and fast recovery. Several physicians suggested a recovery time of 6-8 weeks, which would have crushed most of my season. 4 weeks from the date of the tear I returned to competitive squash with no further complications. Hopefully this post will help provide some guidance on the process I followed.
Forget PRICE, call the P.OL.I.C.E. (Protect, Optimal loading, ice, compression and elevation) – link to prior blog
Ice, compression, elevation
Admittedly the evidence for improved outcomes with ice, compression and elevation are inconclusive at best. However the ice and compression (with a tensor bandage) in an elevated position did provide some much needed pain relief early on (first 72 hours).
Protect
The Don Joy Air Cast high boot (insert picture) was integral for protection, comfort and early return to weight bearing. I was able to start wearing the boot full time within 24 hours of the injury. I ditched the boot on Day 4 to progress towards a return to full weight bearing. Several researchers have shown that early return to weight-bearing is a critical factor for improved outcomes in lower extremity soft tissue injuries. “Usual” recommendations for the air cast would have been 2 weeks minimum; but this would have been precious rehab time lost at a critical time. To get the right protection immediately, you will need to find a clinic you trust that sells orthopedic braces/supports and will support your short term goal to get rid of said brace/support ASAP. Can you just skip this step and avoid the hassle? In my opinion a return to full weight bearing by Day 4 would not have been possible without the boot.
Optimal Loading
This is without a doubt the most critical component of the rehabilitation process and will require assistance from a health care practitioner experienced in exercise rehabilitation. See below for my general process of progressively loading my calf.
Other treatment:
Class 4 laser. 5 treatments in the first 2 weeks to accelerate tissue healing (during the proliferation stage). Topical and oral Traumeel daily for the first 2 weeks. Soft tissue therapy: 4 treatments 2-3 weeks post injury focused both locally at the site of injury and more broadly along the entire right calf and hamstring.
Optimal loading progression outline:
My loading progressions were derived from 3 broad domains:
1) posterior kinetic chain (glute/hamstring/calf) strength + speed
2) functional (gait and return to squash)
3) calf specific
FUNCTIONAL PROGRESSION-weight bearing boot –> weight bearing no boot –> supported/compensated walk around house/work –> slow walk outside –> fast/forceful push off walk –> walk/jog intervals –> jog/skipping –> running intervals –> on court moderate intensity drills/skills –> simulated game moderate intensity –> 20 yard sprints –> practice/drills/skills 100%
POSTERIOR CHAIN PROGRESSION-supine double leg bridge –> loaded hip thrusters + body weight back squat –> loaded back squat –> prowler slow controlled –> back squat speed/power (see pic 3) –> prowler for speed/power
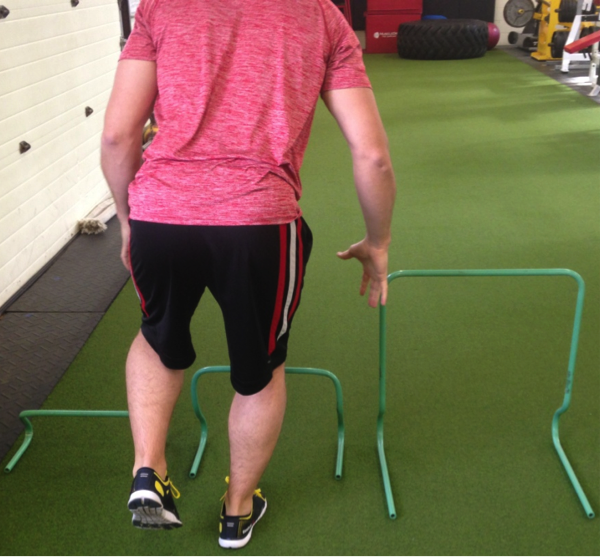
CALF PROGRESSION-double leg isometric hold off step at neutral –> double leg isometric hold at tolerable maximum plantar flexion and dorsiflexion –> single leg isometric holds max dorsiflexion, neutral, max plantar flexion (see pic 1 and 2 below) –> double leg full range of motion heel raises –> single leg full range of motion heel raises –> two leg hopping –> single leg hopping –> single leg hurdle jumps (see pic 4 below) –> single leg hurdle jumps in series (see pic 5 below) –> single leg box jump
Keys to optimal loading.
- Have a comprehensive progressive loading plan.
- Be prepared to progress every session.
- Listen to your body.
How did I determine when it was time to progress? The key is to differentiate between hurt vs harm. My healing tear was in variable severity of pain for the duration of the rehab period, however, “harm” to the tissue was an obvious and instantaneous alarm. Also, the night after a couple of rehab sessions my body let me know I overworked the tissue and obviously I adjusted my loading plan accordingly. Respect and avoid the harm, but work through the “hurt”.
Part 2 of this blog will detail how I determined when I was ready to return to play.